Artefact Three - Binary Code & Data as Images
Selected Image - The square image below was selected for artefact three of this assessment piece.

Exploring of Resizing:
Using the computer program 'Paint', I have resized the above image as guided by the Moodle PowerPoint for Assignment Task 2, Artefact 3. Through this exploration, I am able to make decisions about the size of the image and its resolution, so that the image is clear and optimal for viewing.
Step One: Using 'Paint' to change the pixels in the image and resizing the image.
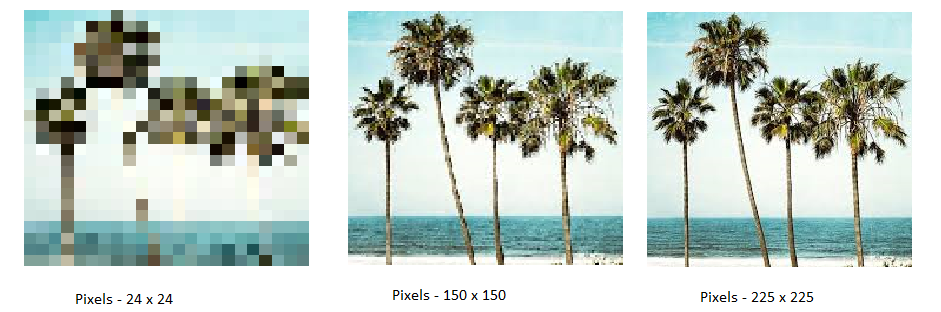
225 is the original number of pixels for this particular image.
Using the computer program 'Paint', I have resized the above image as guided by the Moodle PowerPoint for Assignment Task 2, Artefact 3. Through this exploration, I am able to make decisions about the size of the image and its resolution, so that the image is clear and optimal for viewing.
Step One: Using 'Paint' to change the pixels in the image and resizing the image.
225 is the original number of pixels for this particular image.

Step Two: Change number of pixels for both horizontal and vertical to 24
Step Three: Change number of pixels for both horizontal and vertical to 150
Step Three: Change number of pixels for both horizontal and vertical to 150

Step Four: Compare the adjusted images and make a decision about the best resolution/size for the Weebly.
Explanation and Reflection
To change the number of pixels in the image above, the computer program 'Paint' was used. This is a common program used in schools that allows students and teachers to change images for different purposes, and also gets students to think about images as numbers. As you can see above, the final image (Pixels 225 x 225) is the clearest image. When the number of pixels were changed to both '24' and '150', the clarity of the image was altered when enlarged. If the image was to be left with 24 or 150 pixels, the image would be blurry when enlarged meaning it would not be the optimum size and resolution for this task/Weebly. When exploring this approach, I was able to balance the number pixels with the size of the image so that it was clear and optimal for viewing online when enlarged. I have also found that with a smaller amount of pixels, the different colours and sections of the colours become more defined and are larger, often making the image blurry and difficult to analyse. But with a higher number of pixels, the sections of colour are a lot smaller, making it easier to define the objects in the image. However, if the number of pixels is too high, it can still make the image blurry, meaning it is important to find the balance between size and pixels to ensure that the image is clear and optimal for online viewing.
Link to Learning Outcomes
Chosen Year Level - Foundation to Year Two
Digital Technologies
The activity completed above can be used in a Year 2 classroom for students to achieve the intended learning outcomes of the Digital Technologies learning area. As stated in the Australian Curriculum, students will learn to 'recognise and explore patterns in data and represent data as pictures, symbols and diagrams', and will be able to change the pixel density in a photo with teacher and peer support, identifying the change in file size so that they are able to successfully send it in an email. This activity allows students in Year 2 to experiment with the changing of image resolution and size in order to make and image the ideal size to send in an email. The teacher can use this activity to show students that images and photographs are representations of data and numbers that can be altered for optimal viewing and to successfully send them via email and other electronic means.
To change the number of pixels in the image above, the computer program 'Paint' was used. This is a common program used in schools that allows students and teachers to change images for different purposes, and also gets students to think about images as numbers. As you can see above, the final image (Pixels 225 x 225) is the clearest image. When the number of pixels were changed to both '24' and '150', the clarity of the image was altered when enlarged. If the image was to be left with 24 or 150 pixels, the image would be blurry when enlarged meaning it would not be the optimum size and resolution for this task/Weebly. When exploring this approach, I was able to balance the number pixels with the size of the image so that it was clear and optimal for viewing online when enlarged. I have also found that with a smaller amount of pixels, the different colours and sections of the colours become more defined and are larger, often making the image blurry and difficult to analyse. But with a higher number of pixels, the sections of colour are a lot smaller, making it easier to define the objects in the image. However, if the number of pixels is too high, it can still make the image blurry, meaning it is important to find the balance between size and pixels to ensure that the image is clear and optimal for online viewing.
Link to Learning Outcomes
Chosen Year Level - Foundation to Year Two
Digital Technologies
- Content Description - Recognise and explore patterns in data and represent data as pictures, symbols and diagrams
- Elaboration - learning about how data are represented by changing pixel density (resolution) in a photograph with support and noting the change in file size to successfully email to a friend
The activity completed above can be used in a Year 2 classroom for students to achieve the intended learning outcomes of the Digital Technologies learning area. As stated in the Australian Curriculum, students will learn to 'recognise and explore patterns in data and represent data as pictures, symbols and diagrams', and will be able to change the pixel density in a photo with teacher and peer support, identifying the change in file size so that they are able to successfully send it in an email. This activity allows students in Year 2 to experiment with the changing of image resolution and size in order to make and image the ideal size to send in an email. The teacher can use this activity to show students that images and photographs are representations of data and numbers that can be altered for optimal viewing and to successfully send them via email and other electronic means.
